
[k8s] 3. 쿠버네티스 네임스페이스
Kubernetes namespace
클러스터 하나를 여러개의 논리적 단위로 나눠서 사용
쿠버네티스 클레스터 하나를 여러 팀이나 사용자가 함께 공유하거나,
용도에 따라 실행해야 하는 앱을 구분할 때 사용

위는 쿠버네티스 클러스터를 dev, stg, prd 세 개의 네임스페이스로 구분한 겁니다. dev 목적의 사용자는 dev namespace에 접근하여 오브젝트를 배치 또는 운영하고, stage 목적의 사용자는 stg namespace에 접근하여 운영하는 거죠.
다만 namespace는 클러스터를 논리적으로 분리하는 것이지, 물리적으로 분리하는 것은 아니기 때문에, isolation은 되지 않는다. 다른 namespace의 pod이더라도, 서로 통신이 가능할 뿐만 아니라 클러스터의 장애가 발생할 경우, 모든 namespace가 타격을 입게 되니다. namespace를 통한 fault-tolerance 확보등은 이루어질 수 없습니다. isolation을 원할 경우, 쿠버네티스 클러스터를 다중화/이중화 함으로써 해결해야 합니다.
namespace의 목적
- 네임스페이스별 리소스 할당량 지정
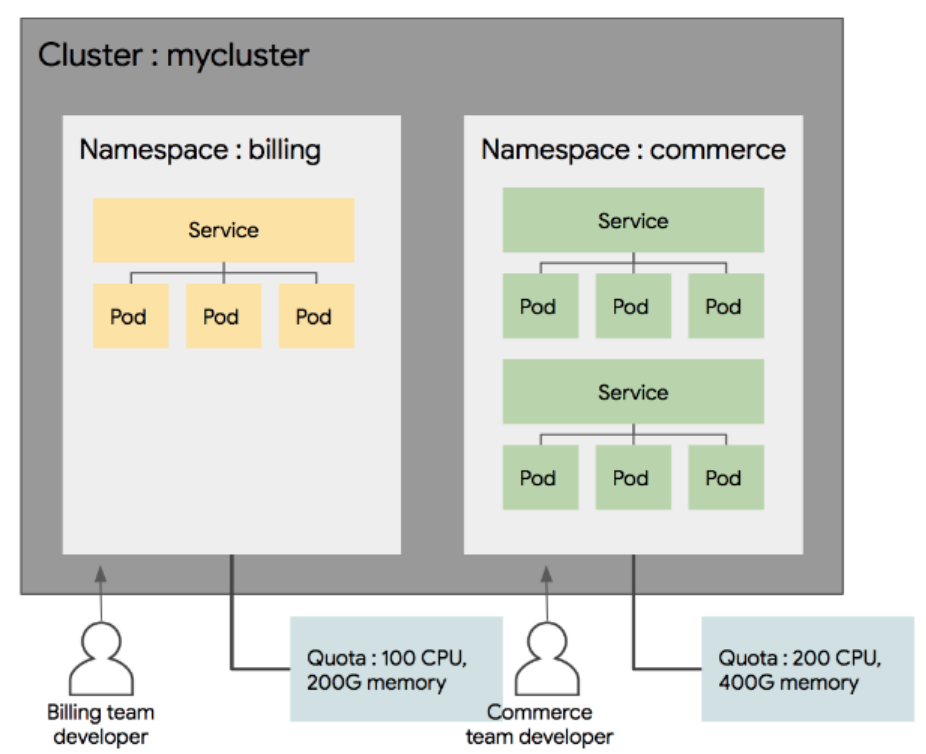
네임 스페이스를 통해 CPU/GPU 할당량을 조절할 수 있습니다. 서비스의 운영 환경은 지연이 발생하지 않도록 매우 강력한 power와 리소스를 가져야 하지만, 개발과 신규 기능 및 수정 사항을 테스트 하기 위한 환경은 그 정도로 powerful할 필요가 없습니다. 따라서 자원을 각각 필요한 만큼 할당할 수 있습니다. 빈약한 환경 속에서도 최적의 개발 및 운영 환경을 구축하는 거죠
- 사용자별 네임스페이스 접근 권한
Authorization이라고 하는 분야의 이야기죠. 권한관리는 Well-made 서비스를 위해 반드시 필요합니다. 쿠버네티스 클러스터의 api나 namespace에 접근하기 위해서, 유효한 사용자 인증(authentication)을 거치게 할 수 있습니다. 사용자 인증 후, 해당 사용자가 api 또는 namespace에 권한이 있는지 체크하고, 검증된 사용자만 api를 사용하게 하게 됩니다. 일반적인 Authorization은 ABAC(Attribute-based access control)과 RBAC(Role-based access control)로 구분됩니다. ABAC은 속성 기반의 권한 관리로, 사용자/그룹/요청 경로/네임스페이스 등으로 권한을 설정합니다. 여기서 언급된 접근 권한은 ABAC을 의미합니다. RBAC의 경우에는 역할 기반 권한 관리로, 사용자와 역할을 별개로 선언하고 둘을 binding 하여 사용자에게 권한을 부여하는 방식으로 구현됩니다. 일반적으로 RBAC이 더 많이 사용됩니다.
Namespace Command
kubectl get nodes
# 현재 node 상태 확인

controlplane $ kubectl get nodes
NAME           STATUS   ROLES    AGE     VERSION
controlplane   Ready    master   6m51s   v1.18.0
node01         Ready    <none>   6m19s   v1.18.0
kubectl get namespaces
처음 namespace를 조회하면 default로 들어있는 namespace들을 확인할 수 있다.
# namespace 상태 확인

controlplane $ kubectl get namespaces
NAME              STATUS   AGE
default           Active   7m52s
kube-node-lease   Active   7m54s
kube-public       Active   7m54s
kube-system       Active   7m54s
특정 namespace내의 Pod 확인
kubectl get pod --namespace {namespace명}
# namespace를 따로 지정하지 않았을 때 default로 default namespace가 지정된다.
# 아래 세가지는 모두 같은 명령어다.
controlplane $ kubectl get pod
No resources found in default namespace.

controlplane $ kubectl get pod --namespace default
No resources found in default namespace.

controlplane $ kubectl get pod -n default
No resources found in default namespace.
yml파일을 이용해 Pod 생성
kubectl create -f {yaml file명}
# nginx.yaml

apiVersion: v1
kind: Pod 		# Pod를 만드는 yaml파일 구성
metadata:
  name: mypod
spec:
  containers:
   - image: nginx:1.14
     name: nginx
     ports:
     - containerPort: 80
     - containerPort: 443
해당 yml파일로 pod를 생성한 후 pod를 조회해보면
# nginx.yaml file을 이용해 pod를 생성
controlplane $ kubectl create -f nginx.yaml
pod/mypod created

# namespace를 따로 지정해 주지 않았기 때문에 default namespace에 생성된 것을 확인할 수 있음
controlplane $ kubectl get pods -n default
NAME    READY   STATUS              RESTARTS   AGE
mypod   0/1     ContainerCreating   0          12s

# test02 namespace를 지정하여 pod를 생성
controlplane $ kubectl create -f nginx.yaml -n test02
pod/mypod created

# test02 namespace내에 pod가 생성됨
controlplane $ kubectl get pod -n test02
NAME    READY   STATUS    RESTARTS   AGE
mypod   1/1     Running   0          26s

# 만약 nginx.yaml파일 자체에 namespace를 test02로 설정해 주게되면
apiVersion: v1
kind: Pod
metadata:
  name: mypod
  namespace: test02
spec:
  containers:
   - image: nginx:1.14
     name: nginx
     ports:
     - containerPort: 80
     - containerPort: 443

# 따로 namespace를 지정해주지 않고 create 하더라도
controlplane $ kubectl create -f nginx.yaml
pod/mypod created
# yaml파일에 namespace로 지정했던 test02 namespace에 pod가 생성됨
controlplane $ kubectl get pods -n test02
NAME    READY   STATUS    RESTARTS   AGE
mypod   1/1     Running   0          15s
Pod/namespace 삭제하기
delete
# test02 namespace에 있는 mypod라는 pod를 삭제
controlplane $ kubectl delete pods mypod -b test02

pod "mypod" deleted
# test02 namespace 삭제 (안에있는 pod도 전부 삭제됌)
controlplane $ kubectl delete namespaces test02

namespace "test02" deleted
kube-system namespace 살펴보기
controlplane $ kubectl get pods -n kube-system
NAME                                       READY   STATUS             RESTARTS   AGE
# coreDNS
coredns-66bff467f8-6s4rv                   1/1     Running            0          19m
coredns-66bff467f8-zj5tl                   1/1     Running            0          19m
# controlplane component - etcd
etcd-controlplane                          1/1     Running            0          19m
# 가상환경을 제공해주는 katacoda 서비스 (katacoda를 통해 실습 중이기 때문에..)
katacoda-cloud-provider-7d7b85c764-zl9d6   0/1     CrashLoopBackOff   7          19m
# controlplane component - kubeapiserver
kube-apiserver-controlplane                1/1     Running            0          19m
# controlplane component - kube controller manager
kube-controller-manager-controlplane       1/1     Running            0          19m
# network plugin으로 flannel 사용 중
kube-flannel-ds-amd64-r6qqn                1/1     Running            0          19m
kube-flannel-ds-amd64-tgwjn                1/1     Running            0          19m
# multi-master를 지원해주는 keepalive 기능
kube-keepalived-vip-8wc5w                  1/1     Running            0          19m
# network proxy
kube-proxy-csqrg                           1/1     Running            0          19m
kube-proxy-tns8h                           1/1     Running            0          19m
# controlplane component - kube scheduler
kube-scheduler-controlplane                1/1     Running            0          19m
namespace 생성
# test01 namespace를 생성
controlplane $ kubectl create namespace test01
namespace/test01 created
–dry-run
--dry-run 플래그를 사용하여 실제로 제출하지 않고 클러스터로 보낼 오브젝트를 미리 볼 수 있다.
controlplane $ kubectl create namespace test02 --dry-run -o yaml
W0807 16:08:48.038540   14845 helpers.go:535] --dry-run is deprecated and can be replaced with --dry-run=client.
apiVersion: v1
kind: Namespace
metadata:
  creationTimestamp: null
  name: test02
spec: {}
status: {}
kubectl create namespace test02 --dry-run -o yaml > test02-ns.yaml
- 확인한 오브젝트를 통해 yaml파일로 생성
controlplane $ kubectl create namespace test02 --dry-run -o yaml > test02-ns.yaml
W0807 16:14:58.605892   17204 helpers.go:535] --dry-run is deprecated and can be replaced with --dry-run=client.

# test02 namespace 생성을 위한 구성파일인 test02-ns.yaml파일이 생성됨
controlplane $ ls
go  nginx.yaml  test02-ns.yaml
# 해당 파일을 살펴보면 다음과 같다.
controlplane $ vim test02-ns.yaml

apiVersion: v1
kind: Namespace 	# namespace를 만드는 yaml파일 구성
metadata:
  creationTimestamp: null
  name: test02
spec: {}
status: {}
- 만든 yaml파일을 통해 namespace를 생성
controlplane $ kubectl create -f test02-ns.yaml
namespace/test02 created

# test02 namespace가 생성된 것을 확인할 수 있음
controlplane $ kubectl get namespace
NAME              STATUS   AGE
default           Active   37m
kube-node-lease   Active   38m
kube-public       Active   38m
kube-system       Active   38m
test01            Active   10m
`test02            Active   7s`
base namespace 지정하기 (namespace switch)
매번 명령어에 namespace를 지정하기 귀찮을 때는, 주로 사용하는 namespace를 base로 지정해 놓고 사용하면 편하다.
그럴때는 k8s의 config에 바꾸고자 하는 namespace를 등록해야 하며, 그 정보를 담고있는 것이 context다.
config살펴보기
controlplane $ kubectl config view

apiVersion: v1
clusters:
- cluster:
    certificate-authority-data: DATA+OMITTED
    server: https://172.17.0.68:6443
  name: kubernetes
contexts:
- context:  # 현재 context의 정보
    cluster: kubernetes # 클러스터명
    user: kubernetes-admin # 유저명
  name: kubernetes-admin@kubernetes # 현재 context 이름
current-context: kubernetes-admin@kubernetes
kind: Config
preferences: {}
users:
- name: kubernetes-admin
  user:
    client-certificate-data: REDACTED
    client-key-data: REDACTED
- test01@k8s 이라는 context를 만들기
config set-context {임의의 context name} --cluster={사용하고자 하는 cluster명} \
--user={유저명} --namespace={base로 지정할 namespace명}
controlplane $ kubectl config set-context test01@k8s --cluster=kubernetes --user=kubernetes-admin --namespace=test01

Context "test01@k8s" created.
-
base namespace 변경하기
kubectl use-context {context명}
# 변경할 namespace 정보를 담고있는 context를 지정한다.
controlplane $ kubectl use-context test01@k8s

switched to context "test01@k8s"
-
현재 context 확인하기
kubectl config current-context
# 현재 default namespace가 test01@k8s임을 확인 가능
controlplane $ kubectl config current-context

test01@k8s
# namespace 지정 없이 `get pod`명령어를 사용해도 default로 test01이 설정되있는 것 확인 가능
controlplane $ kubectl get pods

No resources found in test01 namespace.
댓글남기기